So awhile back I stumbled on a tutorial from Moey's Heart and Health for fancy cake decorating using coloring pages while scrolling through Pinterest. I pinned it for later use on birthday cakes. Then we began making bento lunches. I kept envying all these gorgeous bentos with fantastic character art. I have NO artistic talent and no food decorating experience. So I adapted Moey's technique into one that I could use on food. Using Americolor Edible markers, wax paper, scotch tape, coloring pages, and cheese. Now I am also very lazy so a lot of the time I google coloring pages and tape a piece of wax paper to my laptop screen and color while I'm watching TV. Here' show it would look if I sat down at the kitchen table to do it like a normal human being. Apologies for the poor choice in demo character, not that we don't love Lightening McQueen but he is a great example of what not to pick I'll get to that in a minute. :)
Step 1: Grab your supplies
- Americolor edible markers or other food grade coloring dye, gel, etc
- Wax paper
- Scotch tape
- Coloring page/Image you want to copy
- Stay within the size of your cheese, it's very annoying to piece together multiple pieces
- Stay away from details that will be unreadable when flipped, as this is a transfer all images are mirror images. This is why Lightening is a poor choice, his "95" and "Rusteze" will be backwards
- Avoid too many tiny details, the colors will just smear together and make a mess
- Cheese - I find White works best, provolone, white cheddar, muenster, babybel, mozzarella, etc.
- Cut off a little bigger than your piece of cheese
- Do not trim the width, you'll need it to wrap the uncolored side
- Tape it to your picture
Step 3: Channel your inner child and get to coloring
- Color in the solid colors first as tempting as it is to trace the outline save that for last
- Outline and add details
- Check for dry spots if it starts to dry just go over it again
Step 4: Check your work
- Carefully untape your picture
- Place it over something solid color, preferably white, so you can see if you missed any spaces
- Re-color any dry spots
- This is when it will dawn on you that letters and number will be backwards
Step 5 : Place your cheese on top
- Press firmly but don't tear it
- Go over the whole picture to make sure its all in contact with the wax paper
Step 6 : Fold the wax paper like a present
- Fold all 4 sides over be careful not to move the cheese out of position or it will smear
- You can reattach the tape over the flaps or just leave it creased
Step 7: Flip and rub
- Flip it over and rub the image firmly like you were doing a crayon rubbing
- See what I mean about being cognizant of mirror imaging
Step 8: The big reveal
- Untape, unfold, etc. colored side down on a flat surface
- Carefully peel off the cheese
- Trim the edges with a paring knife for a clean look or cut with a cookie cutter to match your sandwich
- If you're working the night before (as I do) leave it wrapped tight over night
- The colors have more time to saturate the cheese
- It won't dry out if its taped shut
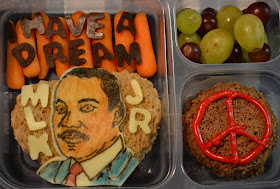
Here are some better examples from previous lunches:
And here's what happens when you don't color in the dry spots and select an image with too many tiny details:
In the end it's just food you can always eat your mistakes and start over :)


Oo! And this way the pens won't get traces of cheese proteins on them and start molding!
ReplyDeleteYep, when I draw directly on cheese I am constantly wiping off the tip.
DeleteHey, that's cool! I totally thought you did that MLK freehand on the cheese! I'm still impressed even if it was traced because this is neato!
ReplyDeleteI wish I could draw freehand, but alas no.
DeleteGreat tutorial - thank you!!!
ReplyDeleteWelcome :) have fun!
DeleteI am so going to try this!
ReplyDeleteIt's easy and fun!
DeleteThank you so much for these amazing coloring pages! They have been such a blessing for us!
ReplyDeleteThank you, that's wonderful!
DeleteAh Ha! That's how you do it. I've been actually drawing "on" the cheese. Never works too well. LOL!
ReplyDelete